
.jpg) |
| Window Mock-up - we decided to increase the steel fin projection 1" more than what is shown here. |
If necessary, we might build a mockup as accurately as possible, using the actual materials and assembly.
Often, however, just a bit of cardboard and tape is sufficient to show you what you need to see.
This is a mockup of a window opening detail. The cardboard is being held up against a window on our existing house, to help simulate the effect.
There are two general categories of window styles on this project:
- Punched Openings, like the one shown here, where the window is a single entity located in an expanse of wall. The term "punched" refers to the impression of a hole being popped through the wall, like a hole-punch would do to a sheet of paper.
- Slot Windows, where the windows are arranged to make a linear "slot" that cuts into the wall top-to-bottom, or sideways.
Each of these conditions is detailed differently.
 |
| Steel box that is placed around the exterior of the window. We started with up-turns at the top and sill, but determined it was better to do without. |
This detail also resolves an issue encountered when you use exterior insulation and a rainscreen - the plane of the siding is well away from the window, and requires fussy carpentry to turn the corners (sides, top, bottom) back to the window.
The sill condition is especially important, as it needs to have a sloped, durable material that would ideally project beyond the siding plane and have a drip detail to keep water off the siding below. What happens as that sill meets the jamb is critical; this is a common leak point.
This steel box detail solves all of these problems simply and effectively.
(Plus we think it looks great.)
There is another version of this detail seen in a few modern buildings that we admire for its look: the steel box with frameless glass flush to the outside:
 |
| Image credit: Culmax Glass Structures |
But we don't admire it for its energy efficiency.
There is no good way to effectively insulate around the projecting perimeter without losing the ideal effect by adding a suitable thickness.
Also, the glass pushed out to the edge has no shading whatsoever. And to get that super crisp and clean look, the window can't really be operable or the thick frame ruins the effect.
Looks great though. But good design is about more than visuals.
We have a similar condition at our projecting breakfast nook that would have looked great like this. This is the pretty much idea we started with. We had to fight the impulse mightily. Instead, we added the required thickness for insulation. And we added some sun shading, and an operable window. And now we have something different than where we started, but what we have not only looks great, but will perform well. Finding the balance.
As architects we struggle against this issue constantly. A lot of the sexy modern details that make us swoon don't fit our commitment to a high-performance envelope. Steel beams, or concrete walls, that go from inside to outside look dramatic, but act as radiator fins to bring the outside temperature directly inside.
On the other end of the spectrum, super-efficiency buildings often focus so entirely on eeking out performance gains, that they forget to also design lovely buildings and spaces for the people who inhabit them.
We are committed to finding the most pleasing and responsible balance between these two, often competing, ideals. After all, what is the use of a super-efficient building if people don't want to spend time in it.
On the subject of window details & performance, the perimeter of a window (the frame and the installation issues around the frame) is one of the weakest points in a thermal envelope. Usually worse than the insulated glass itself. The best approach for improving this weak point would be to buy very high-performance triple-pane European-style windows - they have a thick insulated perimeter frame, and operate in such a way as to allow you to cover the installation gap and much of the surrounding frame with insulation. Unfortunately, our budget was too tight to allow for these windows, though we carried them for as long as we could before budget reality stepped in.
We are still using good quality windows with high-performance glazing. Depending on other choices made with the building, one can actually achieve Passive House certification in this climate with a good double-pane nail-fin window. The sealing and insulating effort during construction will be as good as can be. We believe that these windows will be sufficient for a high-performance home in the relatively mild climate of Portland.
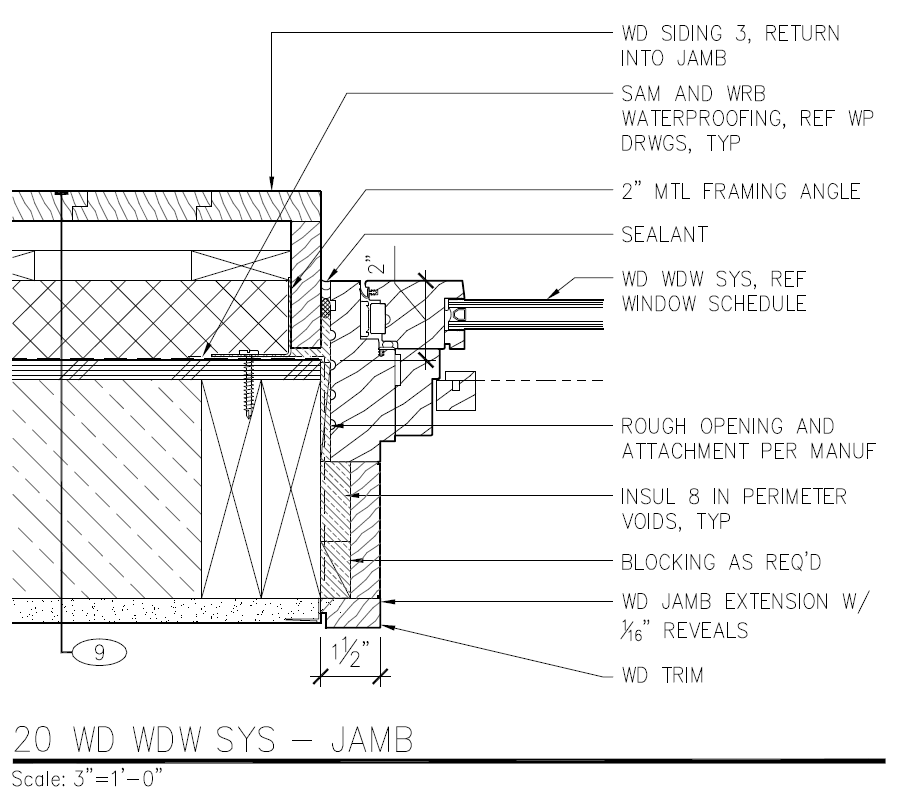
At first glance the steel box detail we are using seems like it might provide a thermal bridge into the wall. Looking more closely, however, it only extends to cap the edge of the exterior insulation - a condition that would occur regardless of the material. A wood siding return would do the same thing, but the thickness of the wood and the nailer to hold the wood will push the exterior insulation back a couple inches away from the window. The steel detail allows the exterior insulation to get as close to the window frame as possible, insulating the maximum amount of wall. The displaced insulation makes more of a difference than the steel fin at the edge. This is shown in the drawings and Therm models below. The steel fin detail actually performs very slightly better.
 |
| MW House Jamb Detail |
 |
| Detail showing condition if siding was used in a typical way to frame the opening around the window. |
Here are these details modeled in Therm, to show how they affect thermal performance of the assembly. Each of the wavy horizontal lines represents a temperature gradient as the 32 degree F outside air transitions to the 70 degree F inside air.
 |
| Red dots added to highlight a temperature line showing how colder temperature dips further into the wall at the Wood Siding condition. |
Disclaimer for Therm geeks: The actual window assembly would need a lot more effort to model accurately; for these purposes it is sufficient that the window was roughed in. It was necessary to make some other assembly modeling assumptions, but the same assumptions were used on each for consistency. Did not attempt to model fasteners in these assemblies.
The mounting tabs are the place where there is a legitimate partial thermal bridge past the exterior insulation, since they tuck in under the insulation where they occur. The tabs are small however, so the affected area is small. A reduced conductance value was assumed here to reflect the three small tabs instead of a continuous steel bar. We are experimenting with setting the tabs on Aerogel pads to solve this issue entirely.
On the interior, you can see that we opted for drywall returns at the jamb and heads of the windows, instead of trimming them out with wood. This is an affordable detail that gives the window openings a clean modern look.
The house will have clear-finished douglas fir window sills to complement the douglas fir window frames.
Well, this post started out with a simple picture of a mock-up, and then went down the rabbit hole of design decision-making and building science. No decisions are ever simple when you care about the performance of your exterior envelope. Hope you enjoyed the ride.
Are all the cool kids using Therm these days?
ReplyDeleteYou know dat!
DeleteAlso, curious about the radiant slab to board form wall detail. I assume it's broken by rigid? What's the most economical amount of insulation to use? I assume you have less to worry about as the heat will want to rise?
ReplyDeleteYes, the slab is insulated beneath it by 6" of EPS insulation.
DeleteAt the perimeter, there is 2" of XPS that separates the slab edge from the stem wall.
The XPS extends all the way down to the footing - this makes a big difference with the heat loss.
At the places where the slab edge is level with the stem wall and will be visible in the room, the XPS is chamfered at the top to leave as much as we can, but will be covered when we add the drywall and base boards.
Where the stem wall extends up past the slab (Living & Dining) the XPS continues up the inside face, and is taped to form a vapor barrier. Then a 2x4 wall is built inside of that with insulation. This allows us to have the concrete effect that we want on the exterior, but a nicely insulated wall on the interior.
It will be hard to cover the concrete on the interior though - it is so beautiful - but I'm not about to have uninsulated concrete walls in our house.
http://imgur.com/CIiojGS
ReplyDeleteWhat guage metal was used for the box frame?
ReplyDeleteI used 3/16" steel plate. Ordered it from the steel yard in the widths required, and I cut it to length and angle myself.
DeleteWhat was the cost of each steel box for the window size you are showing in your blog? Thank you.
ReplyDeleteAlso any tips after a couple years of it being installed? Room for improvement?
The cost is hard to calculate precisely, since I did the labor myself. Bought steel cut in widths from steel yard. I cut it to size, and welded together, prepped, primed, painted, and installed myself.
DeleteNo complaints at all so far. Still working well, and looking good. Only trouble I had was that I painted the large steel box at the b-fast nook when it was icy out, and below the recommended temperature for the paint. I ended up having to sand it and repaint it in better weather after a year.
Another tip - give careful thought to the detail at the top where the siding starts again. You have an opening to the inside of the rainscreen that you need to deal with, assuming you leave an air gap as you should. A few ways to solve this - just know what you plan to do going into it.